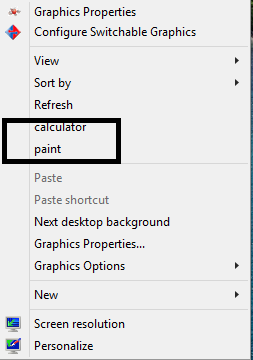
Customize Windows Context Menu
Customize Windows Context Menu
Context menu can be normally 4 type which are:
You can customize the context menu by your-self just to follow the step below.
How to modify the windows context menus ?
First of all , you are using windows OS. =|
Second is you find out which type of context menu you want to customize. The types as I mention above and do the corresponding modification.
- HKEY_CLASSES_ROOT\* (option in All files context menu)
- HKEY_CLASSES_ROOT\Directory (option in folders context menu only)
- HKEY_CLASSES_ROOT\Drive (option in Drives context menu only)
- HKEY_CLASSES_ROOT\Unknown (option in unknown files context menu)
Third, is open registry. =| "Win + R" -> type in "regedit" without the quotes.
Fourth, find the corresponding key(each of the directory is what we call key). As state in second step, double click the key you will find "shell" and also "shellex".Right click on the "Shell" and then "New-> key".You can give any name to the key. Mine is "paint".
Fifth step is then double click the "Default" string value in the right-side panel. The string value is the name that will show in the context menu.
Sixth step is add one more key under the calculator and must name it as "command" without the quote.Then double click the "Default" one the right side panel , and put in the path of application. For example paint.
Done you can now right click and choose the paint to open the paint editor. You can change the path to the application you want to add.


Comments
Post a Comment